

Micro:bit warm-ups
A few simple exercises on the virtual Micro:bit
Warm- ups
A few simple programs to help you get started

What URL?
Finding the coding web page
There are two main block-based coding web pages for the Micro:bit. The simpler version is at this URL: http://microbit.co.uk/create-code

Hello world
Your first Micro:bit program
This simple program displays words and letters on the LED screen of your Micro:bit. You can find the blocks you need in the 'basic' tab. Just drag them out and drop them to snap together.

Testing your code
Running your code
To run your code just click on the play button. This will swap your screen to a virtual Micro:bit

Virtual Micro:bit
Simulate running your code
Here is what the virtual Micro:bit looks like. To return to the coding, click on the Micro:bit symbol in the upper right-hand corner.

Display numbers
Getting data out
Use a numbers block to display numbers, because numbers are different from the strings of letters that make up words.

Events
Use buttons to trigger your code
Turn on the LEDS of your Micro:bit using the left button. Click on the virtual 'A' button to activate the LEDs. You can find the purple 'on button' block in the input tab.

Loops
Blink an LED
How could you make the blink slower?

Decisions
If blocks
Use buttons to interact with your Micro: bit. You can find the 'if' blocks in the logic tab. The 'button pressed' blocks can be found in the input tab.

If else blocks
Where do I find them?
To use an 'if/else' block you need to get an 'if' block, then click on the gear and drag an 'else' block into the jaws of the 'if' block, then click on the gear again.

Better decisions
Choosing alternatives via if/else
Use the B button on your Micro:bit to turn an LED on/off.

Read a sensor
Using in-built sensors
Use the built-in compass to find the direction your Micro:bit is pointed. Be sure and use your mouse to move the compass around.

Ins and outs using pins
How to add external sensors
You can add external sensors to your Micro:bit using so-called 'pins' labelled 0, 1, and 2, shown at the bottom of this Micro:bit.

Reading pins
Using the analog read block
This code reads the value of pin zero (P0) and displays it on your Micro:bit. You can find the 'analog read' block under the 'pins' tab. When you run this program click on the virtual pin zero to change the number displayed.

Theory
Why analog read gives you 1023
Digital reads give only on/off, represented by either '1' or '0'. Analog reads are designed to measure things that vary continuously, like light levels, soil moisture levels, or sound waves. Analog reads can give any value between zero and 1023. 1024 is 2^11, represented inside a computer as 11111111111 in binary.
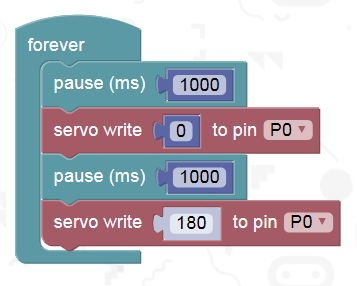
Bonus: servos
Make virtual windscreen wipers
Servos are like motors that only rotate 180 degrees and have very precise angle control. They are used for steering in RC cars. The 'servo' block can be found under the 'pins' tab.

Bonus: 'for' loops
Make limited loops
Count upwards to 4 then repeat. You can find the 'for' loop block under the 'loops' tab. You can find the loop variable 'i' under the variables tab.

Bonus: Radio
Simple Micro:bit to Micro:bit wireless communication
Try using this code. The pink blocks are found in the 'radio' tab. The 'recievedstring' is a variable, found in the variable tab. When you click on the button A in the virtual Microbit, you should see two Micro:bits in your virtual machine.

Bonus: LED strips
Make cool LED tricks with simple code
Neopixel LED strips allow you to individually control the color of each individual LED in a strip of LEDs. To use them with the Micro:bit we will need to use the advanced page: https://makecode.microbit.org/
Go to the advanced tab and choose add package, and then add the Neopixel library. Now you should have a new tab called Neopixel.

Bonus: LED strips- part 2
Make cool LED tricks with simple code
Here is some code to control your Neopixel strip. 'item' and 'item2' are variables, found under the 'variables' tab. You need to create a new variable called 'item2' The rest of the blocks are found under the basic tab or the Neopixel tab. With this code, what happens to the blue spot in the LED strip?
Profile

Bob Elliott
Robotics enthusiast
Bob is a maths/science/robotics teacher with degrees in biology and computing. He has been a member of the Robotics Tamania committee for several years, helping to run the Tasmanian state finals of Robocup Jr. He runs several local robotics club and with his collaborators, runs Arduino/Micro:bit robotics and IoT workshops.


